Food

Rack of Pork

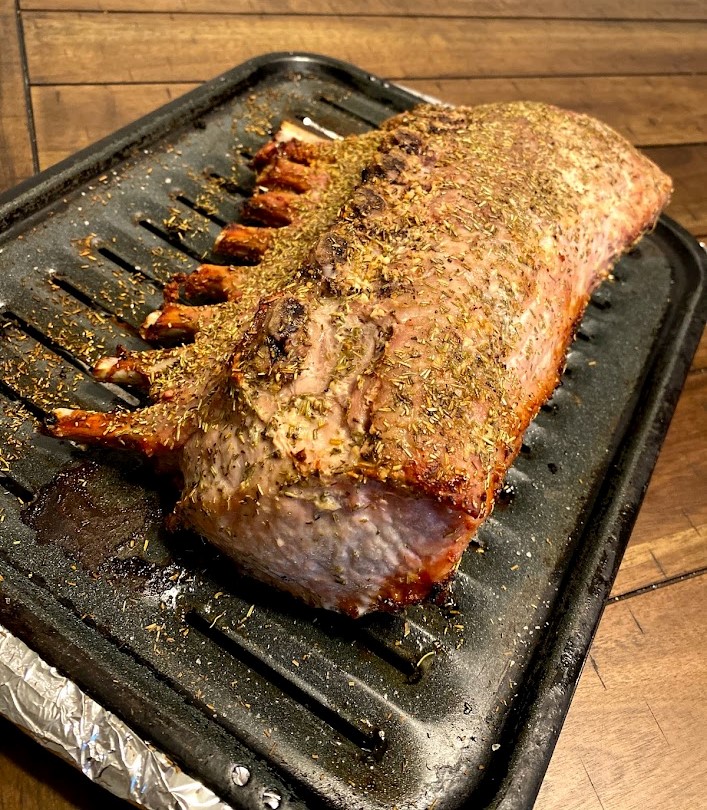
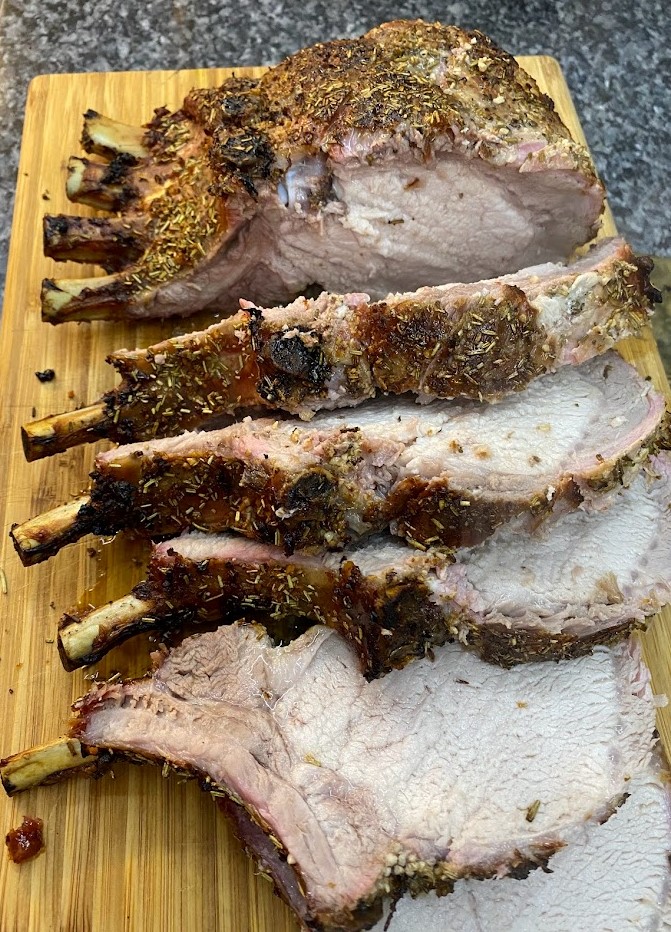
Happy New Year! We’re back at it with a holiday favorite, the rack of pork which is a pork loin with the bone in. I never had a rack of pork until later in life. This cut of meat is so succulent and flavorful. We love it when Fall hits and Costco starts selling this meat which is typically around Thanksgiving. Preparing the rack of pork is super easy. The challenging part is making sure it’s cooked to perfection while in the oven. All it takes is a close eye and a little TLC.

We celebrated the New Year with the rack of pork. The second time this holiday season. Cheers to the New Year!

Rack of Pork

  • Difficulty: Medium
  • Print

Ingredients:

  • 5-6 lbs. Rack of Pork – Pork Loin Bone In
  • 1 Tablespoon of Olive Oil or enough to rub the whole rack
  • Rub pork with minced garlic – don’t hold back
  • 1 1/2 Tablespoon of Rosemary
  • Season with Salt and Pepper to your liking

Directions:

  1. Preheat the oven to 450 degrees and prepare a broiler pan lined with foil.
  2. Place the rack of pork on the pan and rub with olive oil.
  3. Season with rosemary, salt, and pepper.
  4. Place the pork in the oven and cook in 450 degree oven for 15 minutes and then reduce to 350 degrees for 70-90 minutes or until an internal temperature of 145/150 in the thickest cut of meat. Halfway through cooking the pork, flip the rack to ensure proper cooking and browning on all sides. At some point, you may have to foil the bone part of the rack so not to brown too much.
  5. Remove from oven and let sit for 5 minutes before cutting. Eat and enjoy with your favorite sides.

Family, Food

Green Beans with Bacon

Green Beans with Bacon

After years of not eating green beans, I decided to try something new to get my family to enjoy them.  We love bacon in the house so I thought, why not try some green beans with bacon.  It was a huge success so much so that we eat green beans with bacon at least once a week as a side dish.  Not only was the bacon the secret to success, but the Alpine Fresh french green beans from Costco also make this dish.  The french green beans are thinner, cook faster, and are more flavorful then regular green beans.  Of course, this is all my opinion, but I believe if you try these green beans with bacon you will agree.

You can make this dish with real bacon or even use bacon crumbles, but there is only one brand of bacon crumbles that is good.  Yes, it is the Costco brand of Kirkland bacon crumbles.  They are high quality, big chunks of bacon crumbles.  The best we have found.  These green beans with bacon not only taste great, but they are super easy to make especially if you choose to use bacon crumbles.

Green Beans with Bacon

  • Servings: 6-8
  • Difficulty: Super Easy
  • Print

Ingredients:

  • 1 2 Pound Bag of Alpine Fresh Tender Green Beans (we use 1 pound and save the other pound for another meal)
  • 2-3 Tablespoons of Olive Oil
  • 2-3 Cloves of minced Garlic
  • 1 1/2 Cups of Bacon Crumbles by Kirkland
  • Jalapeno Salt & Pepper to taste (not much salt needed due to bacon)

Directions:

  1. Heat 2-3 tablespoons of olive oil in a wok over medium high heat.  Add green beans and garlic, toss in the olive oil, and cover for 8-10 minutes to cook/steam.  Continue to stir green beans.
  2. Once the green beans are getting softer and brighter in color, you can add the bacon crumbles and seasonings.  Continue stirring the green beans and bacon.  At this point, you will have to judge when your green beans are ready.  It all depends on how you like them.  Taste them to see if they are ready.  Some like them a little crispier while others like them more done.  We’ve cooked them both ways, and the family consensus is they do not like them crispier.  I like them both ways.

*Note – If you decide to use real bacon, consider not cooking the green beans in the bacon grease so to help keep calories in check.  If you don’t care, then go for it!  However, I think the bacon adds a ton of flavor even without the grease.

Enjoy!

Follow my blog with Bloglovin

Food

Kale Sausage Soup

Kale Sausage Soup

I know Spring is not soup season, but I love soup year round.  After spending some time on Pinterest I was in the mood for a Kale Sausage Soup, preferably with beans. I found a few recipes,  but most of them lacked the spice so I came up with my own version of Kale Sausage Soup. It’s similar to many that I found, however I added the carrots and the extra seasoning for a little spicy Kale Sausage Soup.

At least once a week, we have soup for dinner.  I’m a huge fan of broth soups.  While I still love cream soups, the broth soups are much healthier. Plus, if they have any kick to them I will love it!  Anything with a little spice is right up my alley.

The Kale Sausage Soup was a hit at this house.  It combines some of our favorite foods of sausage, beans, and spices.  It’s the perfect combination while also being light.  Please check it out.

Kale Sausage Soup

  • Servings: 4-6
  • Difficulty: Easy
  • Print

Ingredients:

  • 1 lb. of Andouille Sausage (chopped and quartered)
  • 3-4 Medium Carrots (chopped thin)
  • 3 Cups of low sodium Chicken Broth
  • 1 Can of Diced Tomatoes (undrained)
  • 6 cups of coarsely chopped Kale (about 8 ounces)
  • Jalapeno Salt (as needed but not necessary)
  • 1 Teaspoon of Cayenne Pepper or more as needed
  • Salt and Pepper to Taste

Directions:

  1. Heat a large saucepan over medium heat.  Add the sausage and carrots. Cook for 4-6 minutes, stirring frequently. Add chicken broth, tomatoes undrained, seasonings, and bring to boil over high heat.
  2. Stir in kale. Reduce heat and simmer until kale is tender.
  3. Stir in beans and cook for 8-10 minutes or until soup is cooked through.

I doubled this recipe so we could have left overs. My kids enjoyed this soup with some of their favorite toppings such as shredded cheese, and tortilla chips.  There is a ton of options with this one. Enjoy!

Food, Garden

Italian Garden Breakfast Casserole

Italian Garden Casserole (1)

It was a cold Sunday morning in January.  We didn’t have any games. We went to mass the night before, and we were in the mood for a big breakfast, a big Italian Garden Breakfast Casserole. I checked the refrigerator.  I had a ton of eggs and some bulk Italian sausage. Next I found some green and red peppers. I always have cheese in the house…always!  A bag of hash browns were in the freezer so it was then, the making of the Italian Garden Breakfast Casserole came to fruition.

Growing up, I never cared much for breakfast unless it was pancakes, french toast, or cereal.  Of course, I loved the sweeter side of breakfast as a kid.  I didn’t eat eggs…any kind of eggs. My Dad loved eggs…any kind.  He liked them prepared any way.  In fact, everyone in my house liked eggs, but me. Finally in my twenties, I slowly started to try some egg casseroles and omelets. I figured the cheese, veges, and meat must help with the taste. Well, I was right. I liked it. I married my husband, who, by the way, loves eggs…any kind, so I started to cook them.  I still do not eat eggs over easy, scrambled, or poached.  But, I have definitely grown quite fond of omelets and casseroles. On this particular weekend, I decided to make a casserole without the bread and use the hash browns as a base.  It really worked out well.  The Italian Garden Breakfast Casserole was a huge hit.  Plus it can be a Make Ahead Italian Garden Breakfast Casserole. Check it out!

Italian Garden Breakfast Casserole

  • Servings: 10-12
  • Difficulty: easy
  • Print

Ingredients:

  • 1 pound of bulk Italian Sausage
  • 1 1/2 cups of chopped Onion
  • 2 cloves of fresh garlic
  • 3-4 cups of Frozen Shredded Hash Browns (country style)
  • 3 cups of Shredded Cheese (I use the Kirkland Costco Mexican blend)
  • 1 cup of diced Green Pepper
  • 1 cup of diced Red Pepper
  • 1/2 cup of diced Green Onions (from about 6-8)
  • 12 Eggs
  • 1 3/4 cup of Nonfat Milk
  • 1 1/2 teaspoons of Dried Parsley
  • 1 teaspoon of Salt
  • Add Pepper and Crushed Red Pepper
  • Bacon Bits (Kirkland Costco brand – best bacon bits around)

Directions:

  1. In a large nonstick skillet over medium heat, cook the sausage, onion, and garlic.  Stir the mixture to break up the sausage into smaller pieces.  Cook until sausage is no longer pink about 10-12 minutes. Drain any liquid.
  2. Coat a 9×13 glass pan with cooking spray. Layer potatoes (unthawed), sausage mixture, 1 1/2 cups of cheese, green/red peppers, and green onions.
  3. In a medium bowl, whisk the eggs, milk, parsley, salt and pepper. Pour egg mixture evenly over casserole.  Season with pepper and crushed red pepper if you like. Sprinkle the top with some of Costco’s bacon bits. If you are planning to make this in the morning, cover with plastic wrap and refrigerate over night.
  4. Ready to bake casserole immediately or in the morning, preheat oven to 375 degrees.
  5. Bake casserole for 70-80 minutes or until egg mixture is set in the middle and the edges are lightly golden brown.
  6. Remove from oven and allow to cool for 10 minutes before cutting.

Enjoy!

Food

Asparagus Wrapped in Prosciutto

Asparagus wrapped Prosciutto

My newest addiction is grilled asparagus wrapped in prosciutto.  It’s the perfect side dish, snack, and appetizer.  I usually make the asparagus wrapped in prosciutto on the grill stove top, but of course you can do these asparagus wrapped in prosciutto right on the grill outside.  I add a little brown sugar for that sweet and salty taste.  They can be wrapped individually or in pairs as I did this time.  Sometimes it all depends on the size. The thicker asparagus work better wrapped as individuals while the smaller ones are better wrapped in bundles of two, three, or four.

Going to a party, bring these grilled asparagus wrapped in prosciutto and you will be the hit at the party! They are so darn good and so easy to make! Check it out!

Asparagus Wrapped in Prosciutto

  • Servings: 6
  • Difficulty: easy
  • Print

Ingredients:

  • 16-20 Asparagus Spears (1/2 to 3/4 thick) with ends trimmed – I like Costco’s asparagus
  • 16-20 Slices of thin Prosciutto – I like Costco’s
  • 2 Tablespoons of Olive Oil
  • 3/4 Tablespoon of Brown Sugar
  • Salt and Pepper

Directions:

  1. Trim off the ends of the asparagus spears, wash thoroughly and pat dry with a paper towel.
  2. Wrap asparagus with thin prosciutto either as doubles or singles depending on the size of your asparagus. Place on a cookie sheet.
  3. In a small mixing bowl, add the olive oil, brown sugar, salt and pepper to taste.  Mix together.
  4. Brush the olive oil/brown sugar mixture over both sides of the asparagus spears.  Add more salt and pepper as desired.
  5. Over medium/high heat add the asparagus bundles to the stove top grill.  Flip the asparagus at least once and cook until prosciutto is crisp and asparagus is tender.  Be careful not to over cook the asparagus.

Enjoy!