Family, Food, Kids, Snacks

Pretzel Rolo Snacks

Pretzel Rolo M&M's

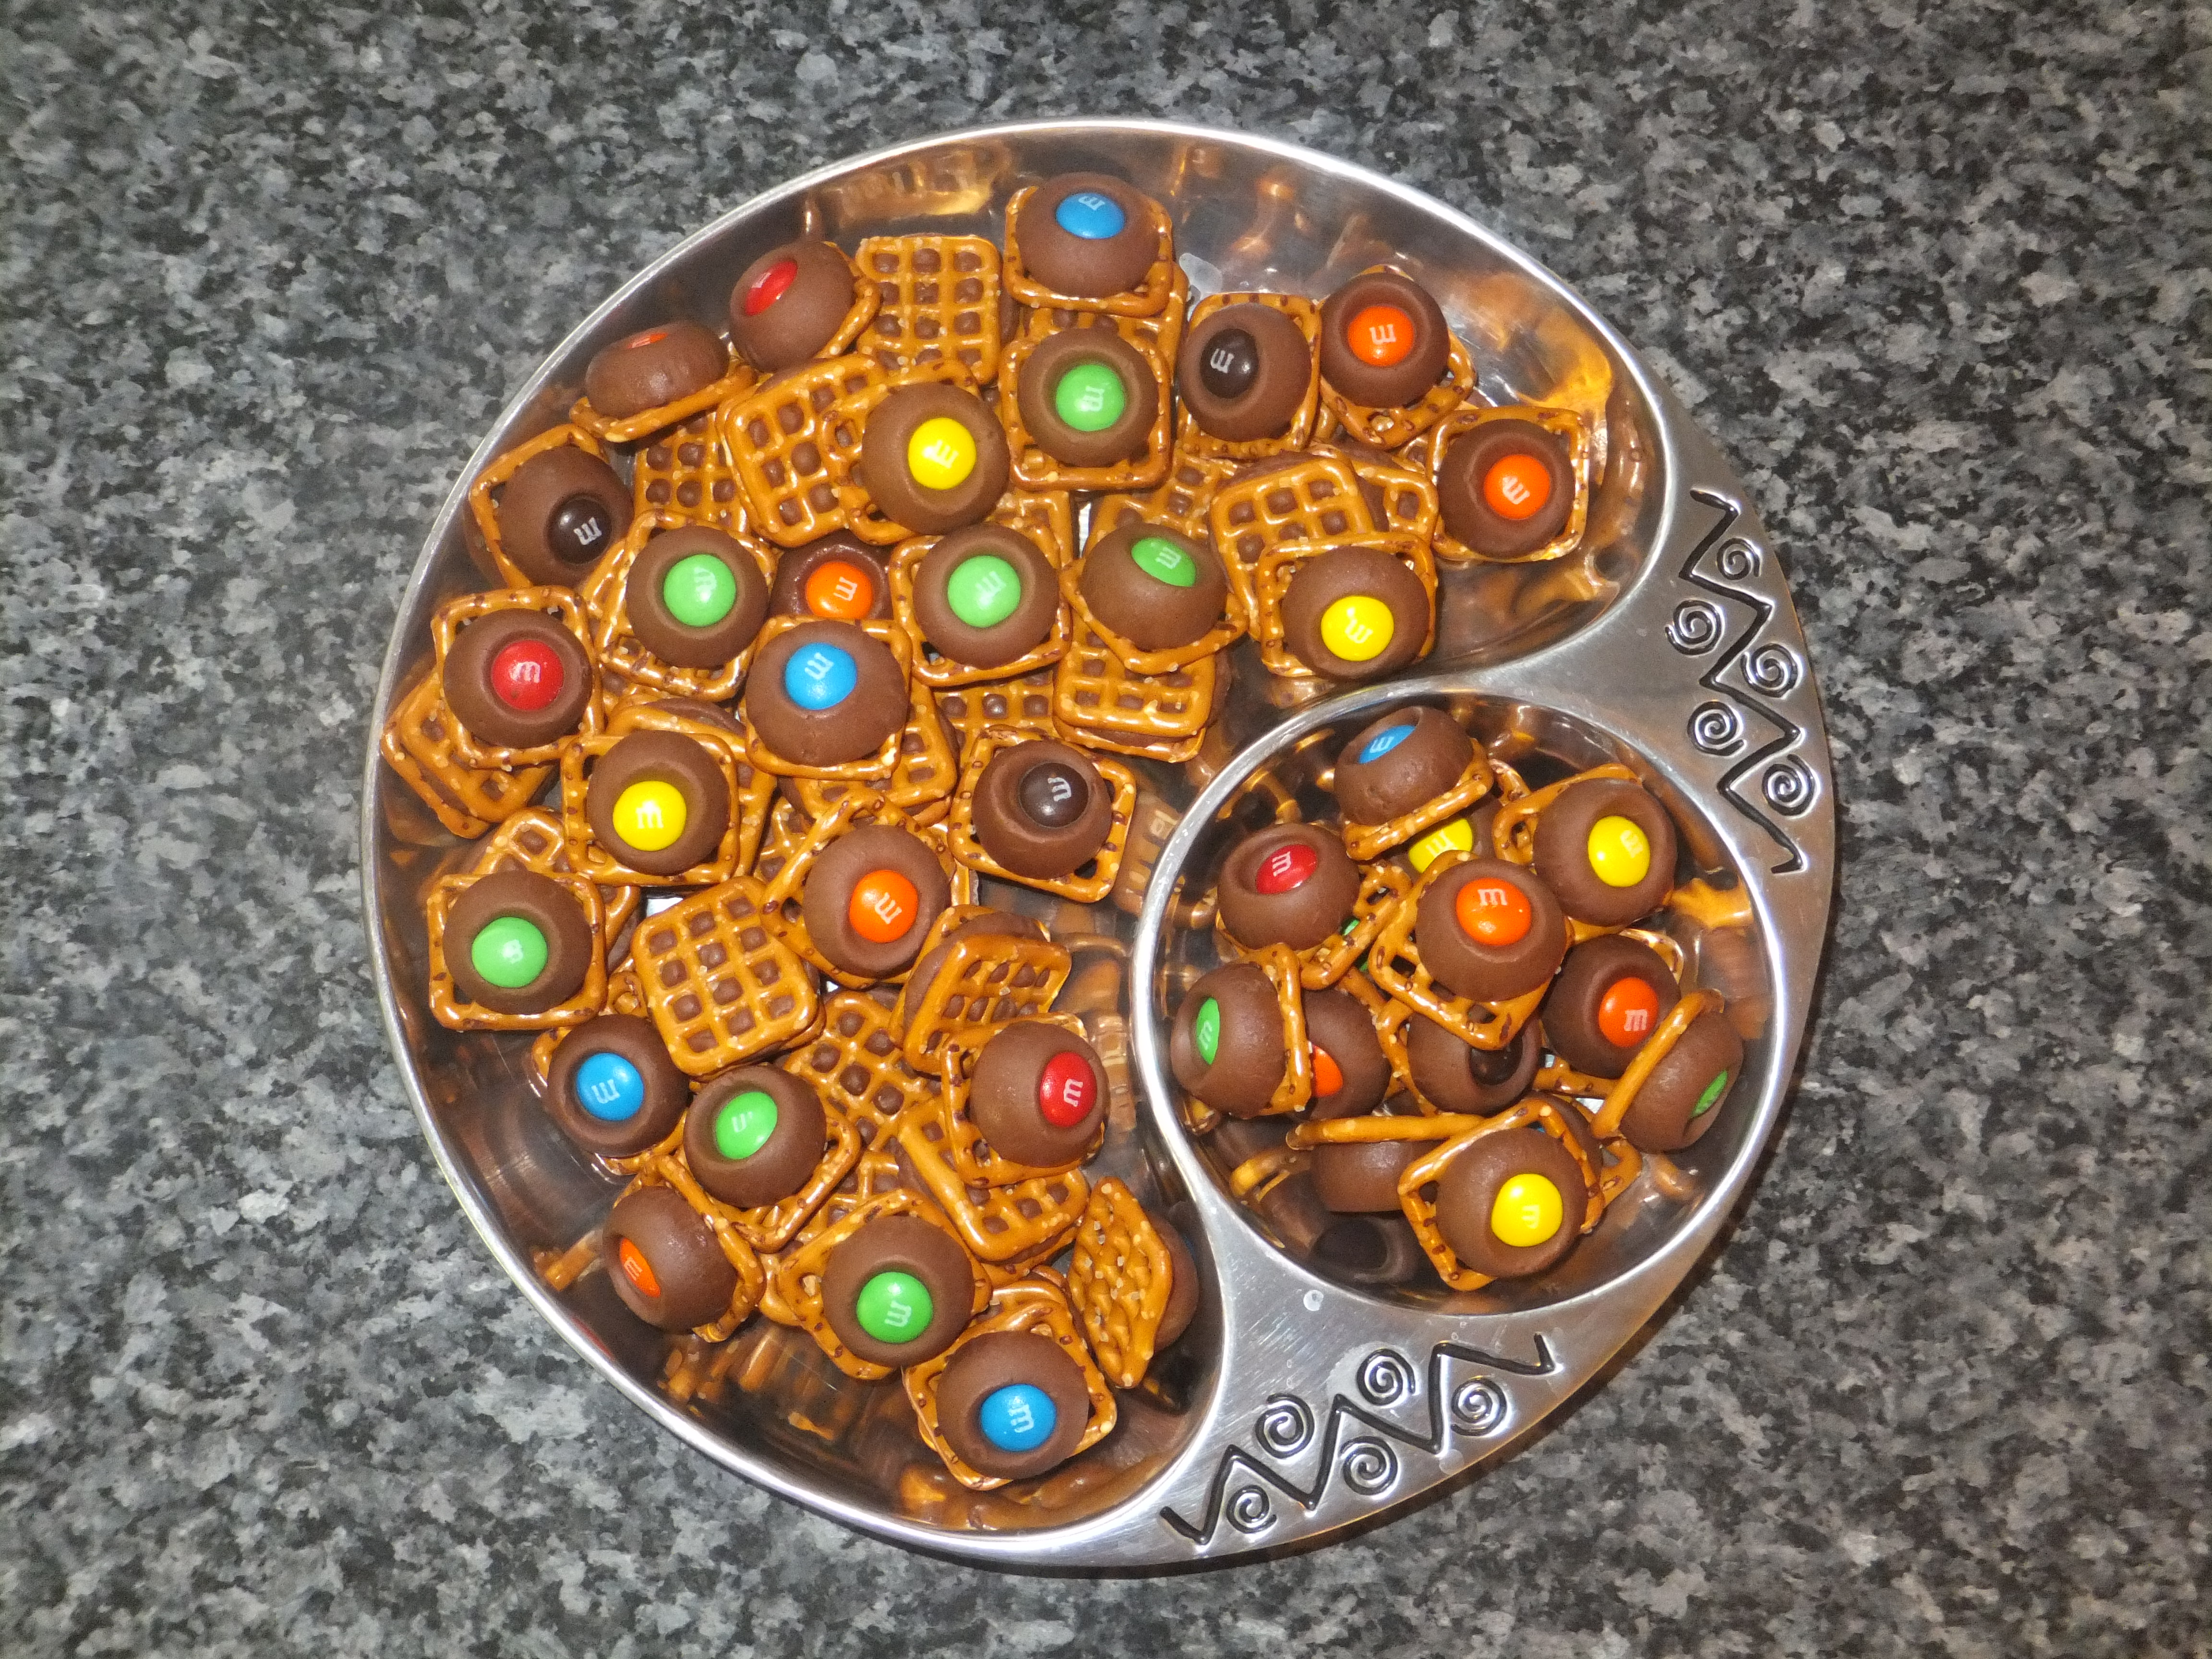
I’m a huge fan of sweet and salty mixed together.  I love pretzels and I love Rolos!  Unfortunately I can’t take credit for this recipe, but I still wanted to share it with you because it’s so good and easy!  Plus, it’s always a big hit at any party and my kids always help out in the kitchen.

There are tons of different variations of these pretzel Rolo snacks floating around.  My all time favorite ones include the pecans on top, however my third child has a peanut and nut allergy so I do not get to indulge in those anymore.  I decided that there had to be something else I could use as my topper on these awesome snacks. I came across a few different options.  I must admit that these Pretzel Rolo M&M’s are just as good as the Pretzel Rolo Pecans. Plus, my little one can eat M&M’s with out any problems so it was good for all of us!

Ingredients

  • 2 bags of Rolo’s
  • 1 Bag of Pretzel Snaps ( can use regular pretzels but I prefer to use the Snaps)
  • 1 (12.60 oz.) Bag of M&M’s
  • Foil

Directions

  1. Place foil on baking sheets.
  2. Preheat the oven to 350 degrees.
  3. Place pretzels on foil until entire sheet is full approximately 1/2 inch in between.Nick making Rolo Pretzels
  4. Open all the Rolos and place in the center of each pretzel. I usually have the kids do this part because they love to pop a few in their mouth.
  5. Place the pretzels with the Rolos on top in the oven for 3 minutes. Remove from oven. Then add one M&M to each one and gently push down to spread the Rolo all over the pretzel.  I also take a few of them and make a pretzel sandwich by adding another pretzel on top instead of an M&M.
  6. Cool the pretzel snacks and then place in the refridgerater so they can set.

The best way to serve them is at room temperature.

Enjoy!

Stage 2
Stage 1
Family, Food

Pasta with Peas and Bacon

Bacon Pea Pasta

It was one of those kind of nights.  I didn’t want to do take out and I didn’t want to go to the grocery store.  It was time to get creative and pull together a meal with some of the ingredients I had at home. Of course, I picked out some of my favorites – pasta, garlic, peas, and bacon!

This meal was so quick and easy and the entire family loved it. It’s a light dish (not low fat), but light and not heavy.  You could use any kind of pasta and/or vegetable.

Who doesn’t like a dish with bacon in it anyway?

Ingredients

  • 1 Bag of Frozen Peas – defrosted
  • 1 Box of Linguine Pasta
  • 1 Small Onion Chopped
  • 4 Cloves of Garlic
  • 6-7 Slices of Cooked Bacon
  • Salt and Pepper to Taste
  • 4 Tablespoons of Olive Oil

Directions

  1. Cook Pasta according to package directions.
  2. While the pasta is cooking, add olive oil to large pan and sauté the onion and garlic.  I use a lot of garlic.
  3. Add peas to pan and stir.  Cook the onion, garlic and peas over medium heat and add salt and pepper as desired.
  4. Drain pasta and add to pea mixture on the stove.  Lightly toss to coat all of the pasta and pea mixture.
  5. Break up bacon pieces and add to pan.  Lightly toss bacon into pasta.
  6. Serve immediately and add fresh parmesan.

Enjoy!  This one is a keeper.

Family, Food, Kids, Snacks

Mini Festive Flag

All American Flag Snack

I couldn’t resist making another flag snack this Labor Day weekend.  However, this time I wanted to change-up my old “go to” flag recipe.  I envisioned a smaller flag using raspberries for my red color.  It worked out great.  There is nothing easier than making these kabobs.  I must admit that I think this smaller version is prettier.  This all American treat is always a favorite with the kids too.

Mini Festive Flag

  • Servings: 4-6
  • Difficulty: Easy
  • Print

Ingredients

Directions

  1. Take five skewers/sticks and thread two raspberries, two marshmallows and four blueberries.  Follow pattern.
  2. Take seven more skewers/sticks and add four raspberries and three marshmallows.  Follow pattern. Arrange on a platter or dish.

The original Festive Flag recipe can be found on this blog http://wp.me/p3uZx8-U.  It’s a bigger version using strawberries.

You pick your favorite patriotic snack.

Enjoy!

Family, Food

Southwestern Stuffed Peppers

Peppers

A little heat and color makes these southwestern stuffed peppers oh so good!  I purchased these beautiful peppers from our local grocery store that is known for its awesome produce, Dierbergs.  And, of course, I doubled the recipe because we like left overs in this house.  However, they did not last long.

Ingredients

  • 6 Peppers of any color (best with four lobes, check bottom)
  • 1 pound of lean Ground Beef
  • 1 small Onion, diced
  • 2 cloves of Garlic, minced
  • 2 tablespoons of Taco Seasoning
  • 2/3 cup of Salsa
  • 2 cups of cooked Rice
  • 1 cup of Black Beans, drained and rinsed
  • 1 cup of Corn (fresh, canned or frozen)
  • 1-1/2 cups of shredded or grated Colby and Monterey Jack Cheese

Directions

  1. Rinse peppers in cold water.  Cut each pepper in half lengthwise, through the stem, removing all seeds.
  2. Preheat oven to 350 degrees.
  3. Brown the ground beef in a large frying pan, breaking up the meat. Add onion and garlic, sauté for 2-3 minutes. Add taco seasoning, salsa, rice, black beans, and corn.  Cook and stir all together for 5 minutes.
  4. Fill each pepper half with stuffing. Place in large corning ware and cover.
  5. Bake in the oven for 40 minutes.  Sprinkle the cheese evenly over all the pepper halves. Bake 5 minutes, or until cheese is melted.

Enjoy these hardy peppers with a light salad or as a meal.

Southwestern Stuffed peppers 2

Family, Food, Garden

Stuffed Zucchini on the Grill

Zucchini Boats

Zucchini is one of my favorite vegetables especially in the summer. I grew up eating zucchini all the time, but I have never eaten them stuffed.

On this particular night, we had one of those great meals…marinated, grilled flank steaks, pasta salami salad, and stuffed zucchini on the grill or zucchini boats.  It was our first time making them.  I must admit they were so easy.  Plus, we love it when the majority of our meal can be grilled.

Last year I could have used this recipe, because I had an abundance  of zucchini from the garden.  However, this year the moles took over and decided they liked my zucchini 😦  I had to buy this batch from our local grocery store, Dierbergs, but they always have wonderful produce.

Stuffed Zucchini on the Grill

  • Servings: 6-8
  • Difficulty: moderate
  • Print

Ingredients

  • 4 medium Zucchini
  • 1/2 cup chopped Bacon (we prefer real bacon as opposed to bits)
  • 1/4 cup chopped Black Olives
  • 1/2 cup diced Green Chiles
  • 1/2 cup minced Red Onion
  • 1/2 cup chopped Tomatoes
  • 1/2 cup of Shredded Cheddar Cheese
  • Salt and Pepper to taste
  • Tablespoon of fresh Basil from the garden

Directions

  1. Cut the zucchini in half lengthwise. Scoop out the pulp to about 1/4 inch from the skin.  Chop the pulp.
  2. In a bowl, mix the zucchini pulp, bacon, black olives, green chiles, onions, tomatoes, and cheddar cheese.  Season with fresh basil and salt and pepper.
  3. Stuff the zucchini halves with the mixture. Seal each half with aluminum foil.
  4. Prepare the grill. Place packets on the grill over indirect heat. Cook approximately 15-20 minutes or until tender.

With stuffed zucchini, you can get creative with the mixture but I don’t think we will deviate from this recipe.  It was so delicious – stuffed zucchini or zucchini boats whatever you prefer to call them!

Enjoy!